


")
")
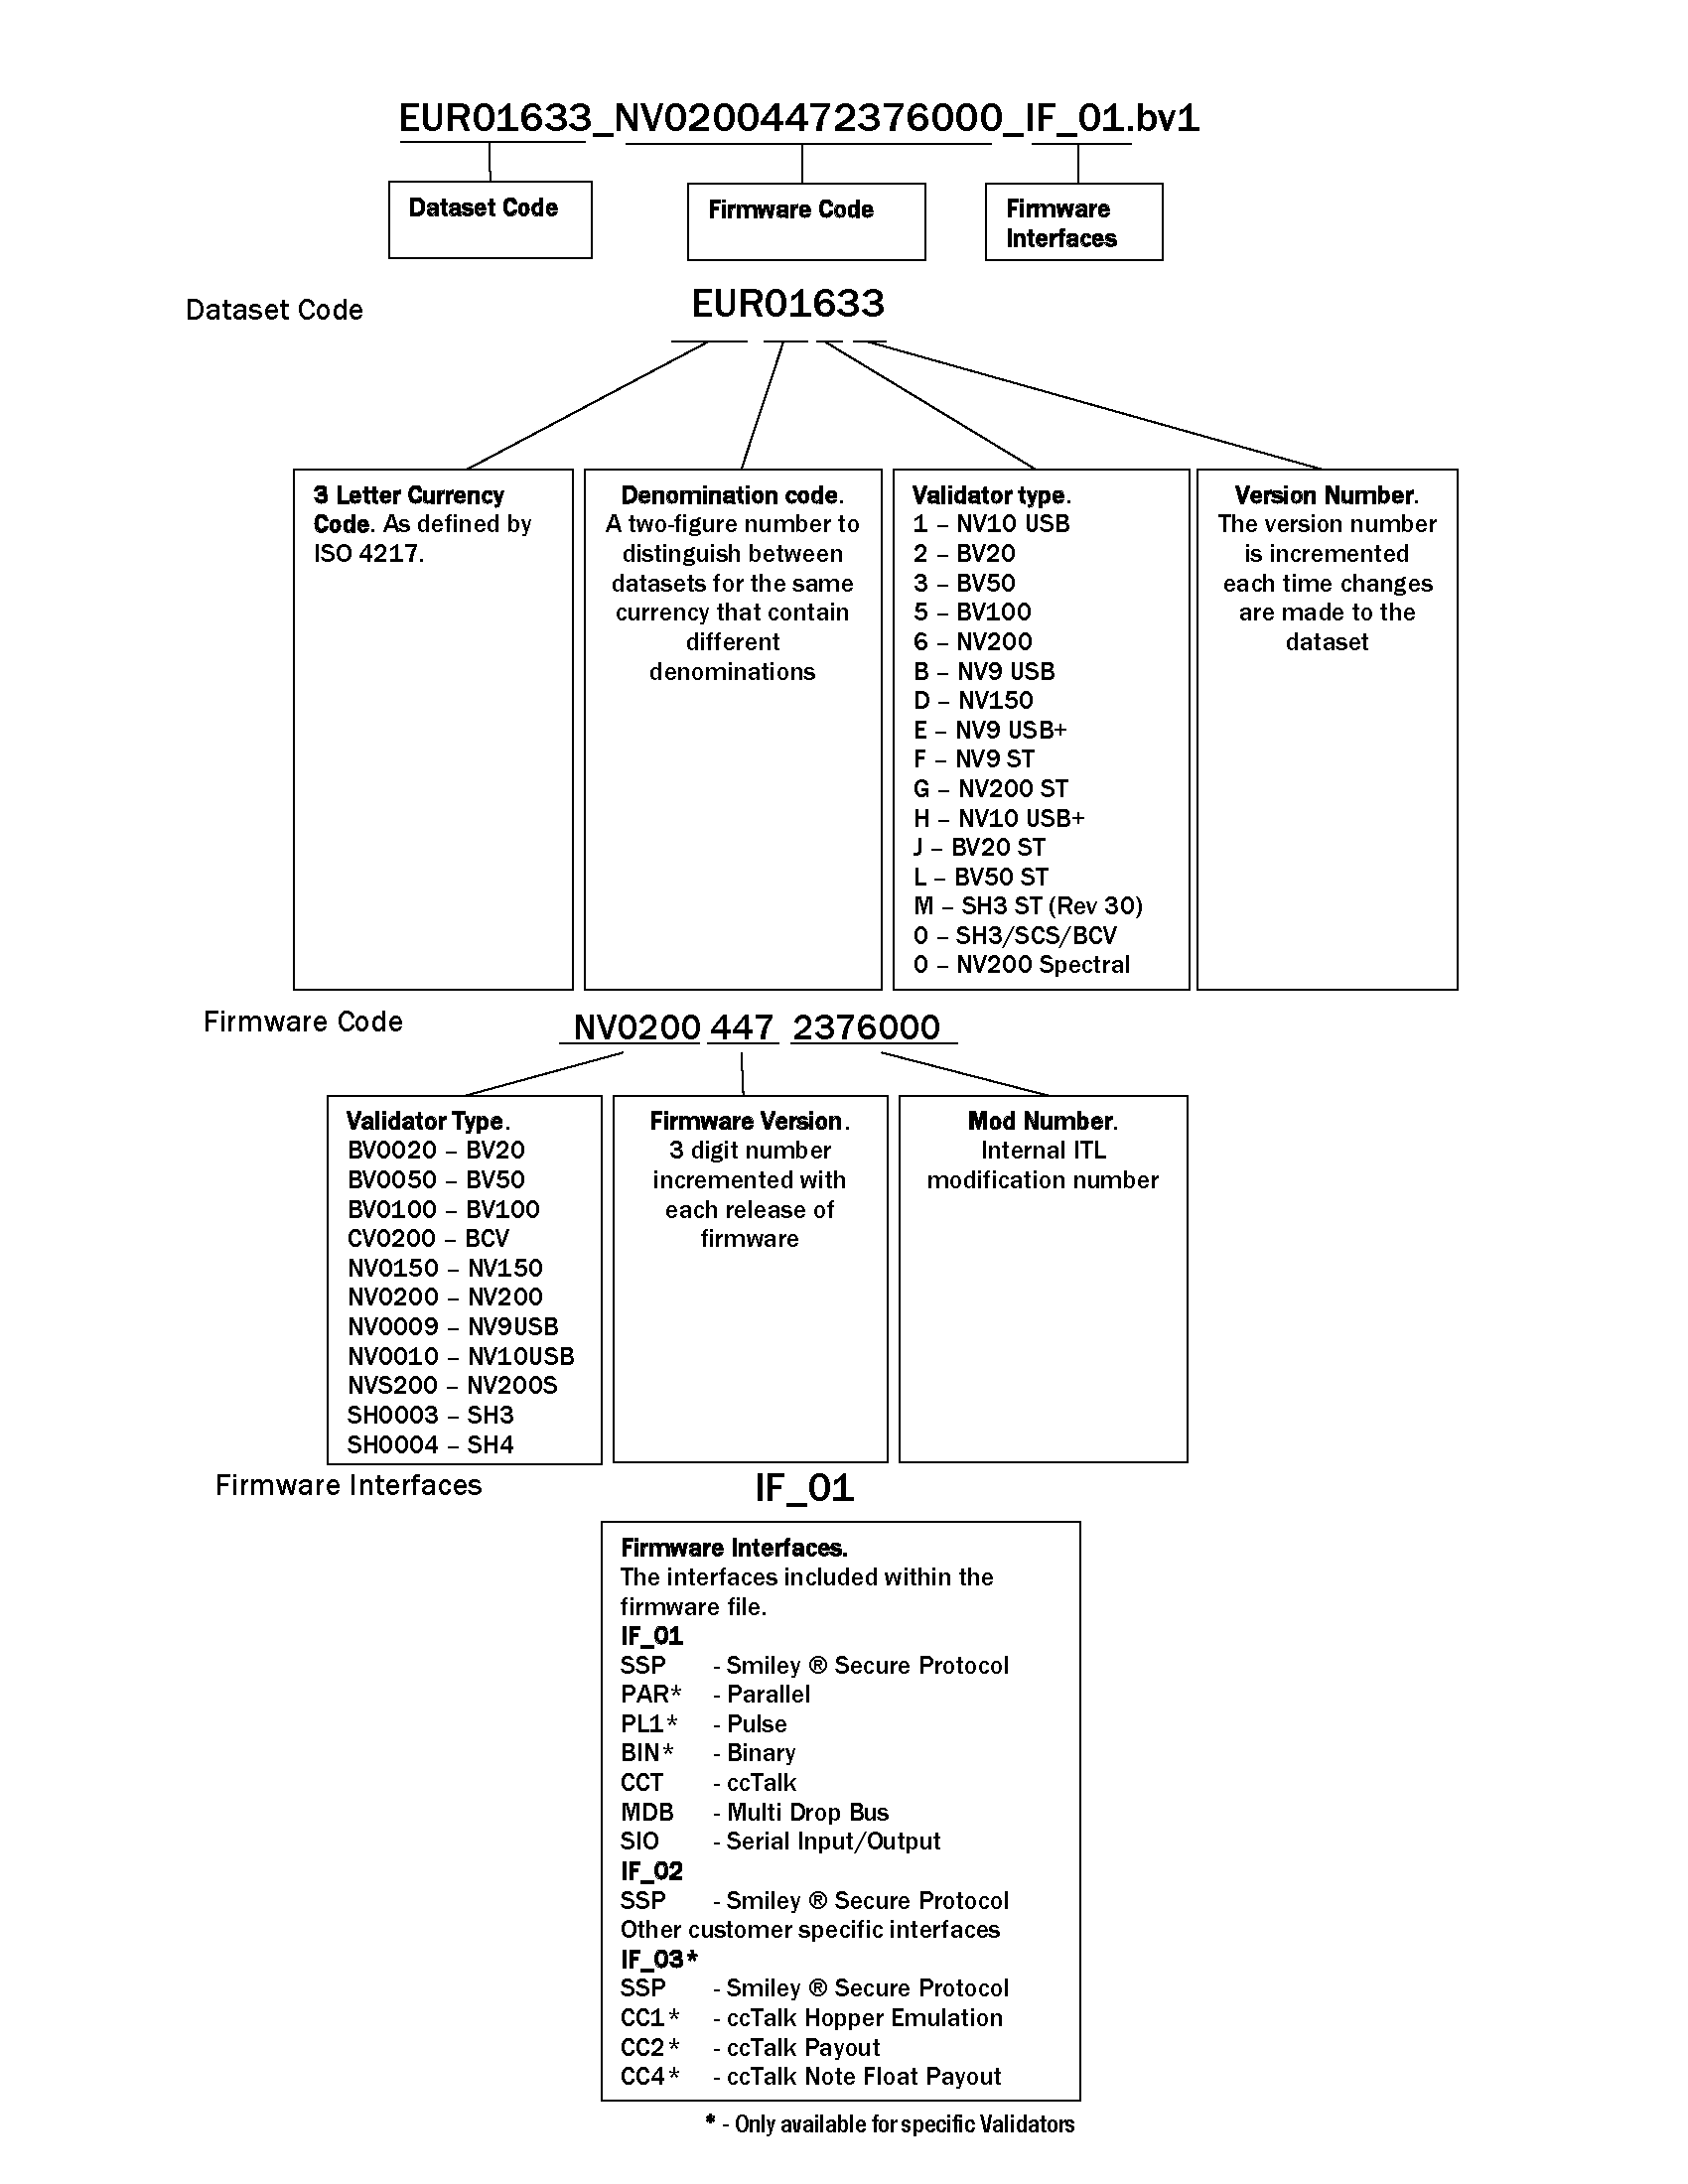
Interpreting Dataset File Names
Interpreting dataset file names.
What Payout Devices Do ITL Offer?
What payout devices do ITL offer?
Innovative Technology offer a number of payout / recycler solutions.
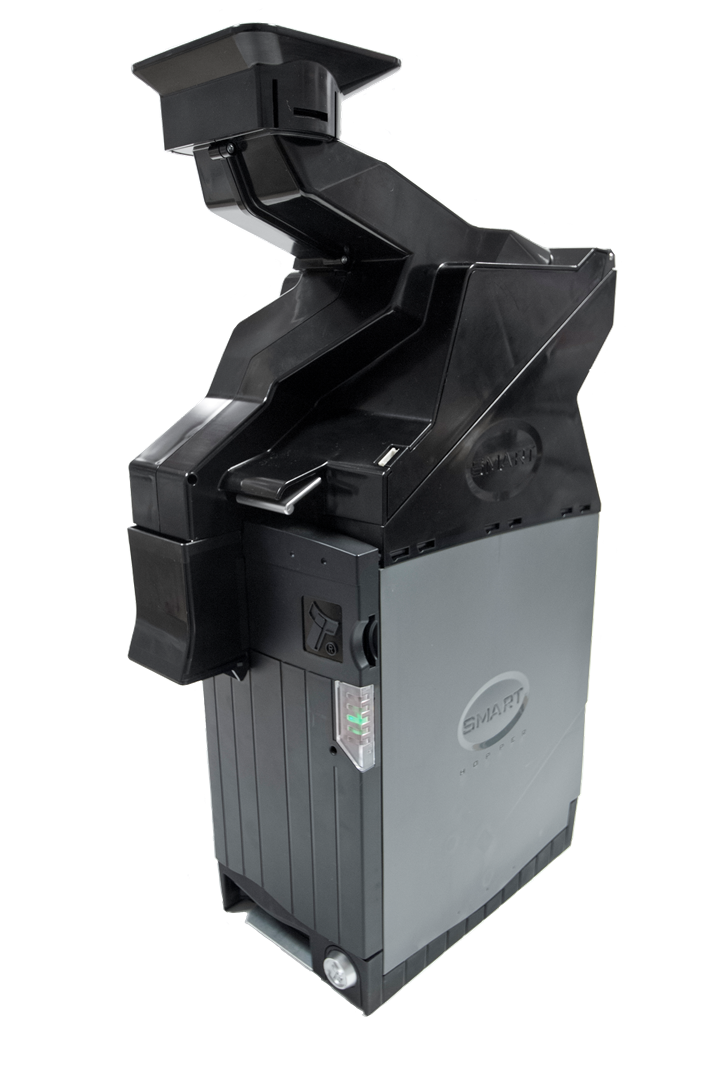
SMART Hopper
The SMART Hopper is a true multi-coin hopper operating at speeds of up to 12 coins per second. It validates, discriminates and stores coins for payout, eliminating the need for multiple hoppers and coin sorters.

SMART Coin System
The SMART Coin System Hopper is a state of the art bulk coin validator, hopper and recycler in one. The unit validates, discriminates and stores mixed coins, eliminating coin starvation & the need for multiple hoppers.
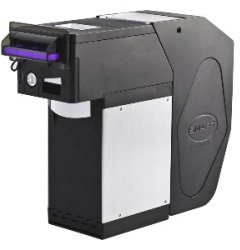
SMART Payout
The SMART Payout is a modular add on for the NV200 bank note validator and can store up to 70 mixed denomination bank notes for payout.
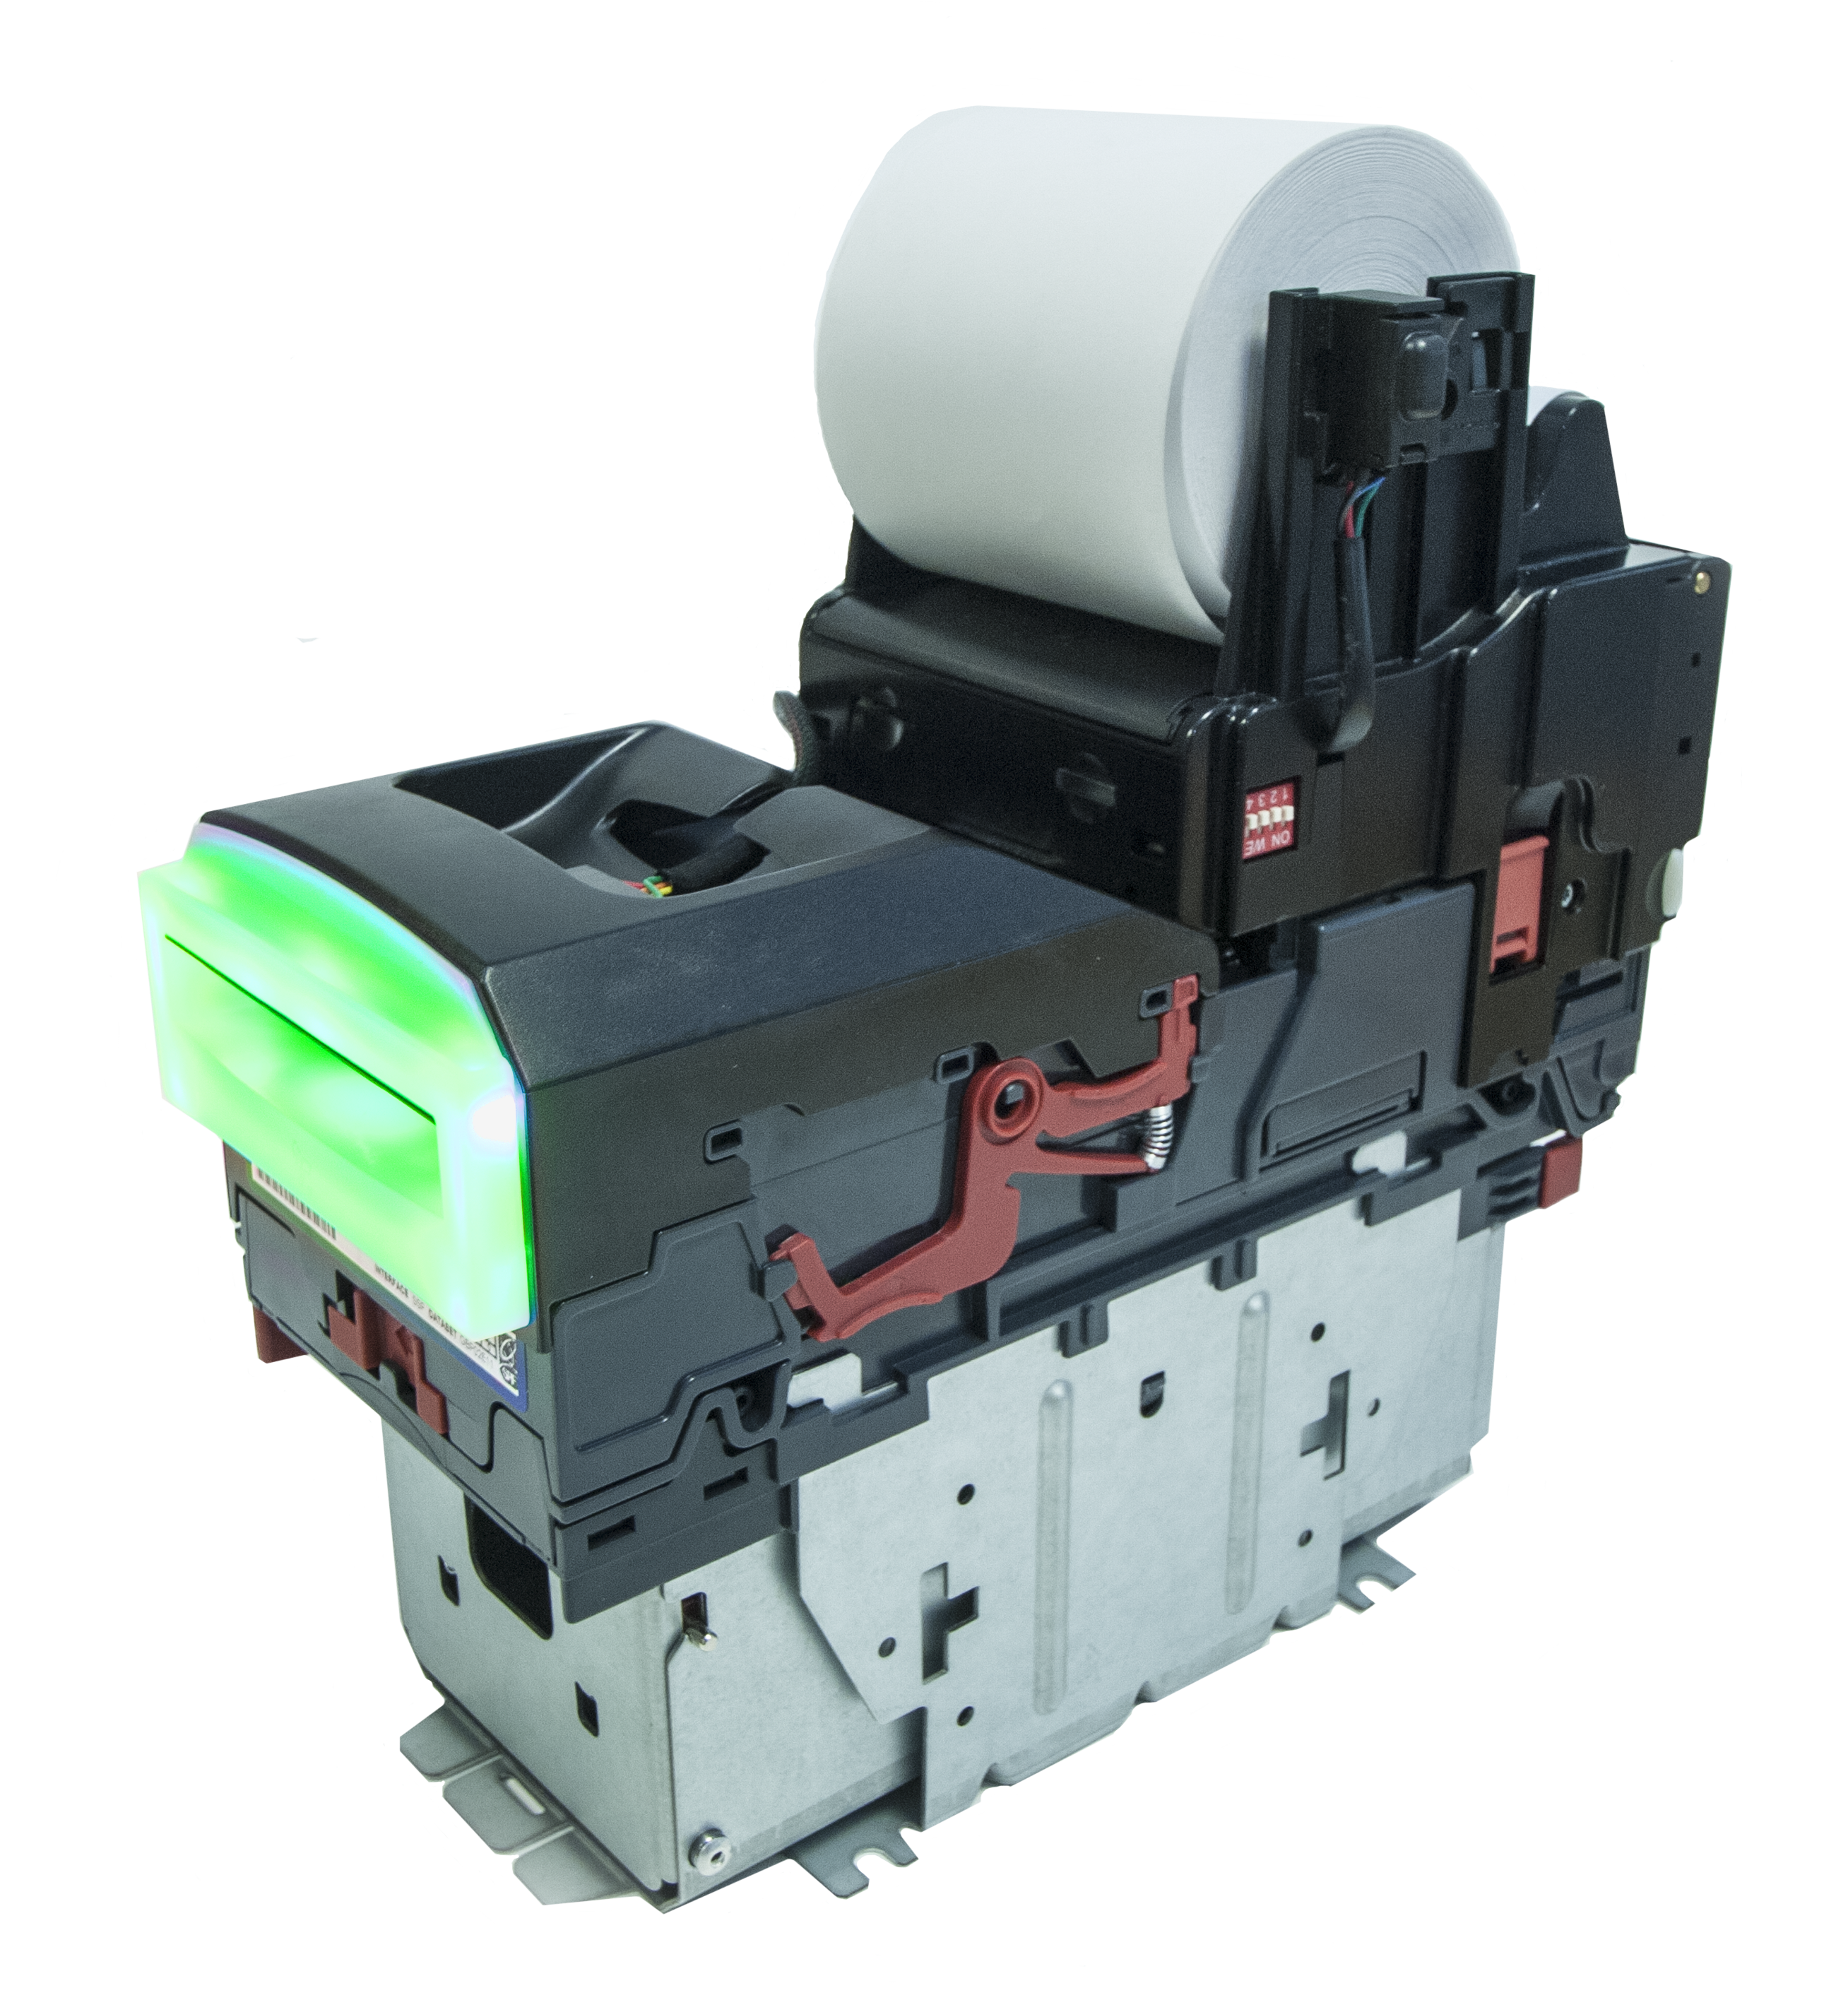
NV11 - Validator + Note Float
The NV11 combines a (NV9 USB) bank note validator with a Note Float payout unit to enable note recycling. Up to 30 notes of a single denomination can be stored in the Note Float, to provide note payout capability - helping to alleviate the pressure on traditional coin hoppers and keep machines running.

NV12 - Compact Validator & Ticket Printer
The NV12+ is a revolutionary compact validator and ticket printer that dramatically reduces operational costs by eliminating hopper starvation and reducing cash handling tasks.
More details of our current product range can be found within Products.
SMART Data
What is SMART Data?
Innovative Technology currency dataset files contain information about the notes that are to be accepted or rejected by the validator and as such are core to the operation of all ITL bank note validators. ITL have developed the SMART Data process in response to an industry requirement to address the following issues:
- The fast turnaround of fraudulent and bad acceptance issues.
- Flexibility in datasets.
- Overcome the difficultly of accessing notes (can’t be exported or transported easily)
SMART Data is based around a free software program allowing end users to alter, create or customise their own currency dataset files. Using SMART Data customers can add a new issue note to their existing dataset file or eliminate a fake note by adding it to the dataset themselves.
The process is simple.
- Note Data is created by the user who inserts their own bank notes into a normal ITL bank note validator (connected to a Windows PC). - No special firmware or configuration is required only SMART Data.
- The SMART Data software application sends the collected data via the internet to the Innovative Technology servers for processing. A new dataset is created incorporating the collected data.
- The new dataset will be available for download from the SMART Data website.
- This new dataset can then be incorporated into ITL bank note validators in the field using standard ITL programming tools.
For more information or to register for a SMART Data account visit
www.innovative-technology.co.uk/smartdata
Marketing Executive, Dayna Patterson said “SMART Data is a really exciting programme that gives ITL customers the tools to customise their own dataset files. SMART Data allows false notes, new issue notes and notes with differing wear patterns to be quickly incorporated into currency dataset files. For example, customers will now be able to incorporate into their currency datasets personal notes that are specific to their area, perhaps heavily worn notes due to supply or notes affected by severe temperature or humidity conditions. SMART Data will be launched at the January shows and I would like to invite everyone to our stands for a demonstration of the new SMART Data programme.”
Operational Manuals Explained
OPERATIONAL MANUALS
The new Technical Manuals are designed to be more user friendly, are split into six sections.
Section 1 – Quick Start and Configuration Guide
Section 2 – Field Service Manual
Section 3 – ITL Software Support Guide
Section 4 – Mechanical and Electrical Manual
Section 5 – Software Implementation Guide
Section 6 – Technical Appendices
The manuals are delivered in a zip file with each section designed to contain the information relevant to a specific area of operation / development.
Quick Start and Configuration Guide:
- This section contains the essential information that a user needs to quickly assemble and configure the unit ready for installation into the host machine.
- The Quick Start and Configuration Guide should be download by most users. Eg. software engineers looking at how to operate the validator, project engineers evaluating their first unit, or installation engineers fitting the unit into a host machine.
Field Service Manual:
- This section contains the essential information that a field service engineer needs to clean or maintain the unit that is installed in a host machine and identify faults.
- The Field Service Manual is typically used by field service engineers who are maintaining the product.
ITL Software Support Guide:
- This section contains the information needed for a user to configure and program the unit, using a range of software tools such as PIPS.
- The ITL Software Support Guide is relevant to any user who wants to test the functionality of the unit, reprogram the firmware or dataset, or set up the encryption key, address or routing for the unit.
Mechanical and Electrical Manual:
- This section contains all the mechanical and electrical information a designer needs to effectively integrate an ITL unit into a host machine
- The Mechanical and Electrical Manual is relevant to design engineers who are designing a host machine cabinet, or looking to integrate an ITL unit into an existing cabinet.
Software Implementation Guide:
- The information in this section details the communications protocols, specific commands and interfaces used including eSSP and ccTalk.
- The Software Implementation Guide is relevant to software engineers looking at how to implement an ITL unit in their host machine, or design engineers looking at including the unit in their host machine.
Technical Appendices:
- This section includes information on product approvals, technical specifications and ordering information.
- The Technical Appendices have no specific audience, but users can find relevant and useful information here.
Manuals are available to download from our website on individual Product Pages
NV9 USB Bank Note Validator Order Options
NV9 USB Banknote Validator order options.
The NV9 USB is a versatile bank note validator with bezel and cash box options to suit most applications. The NV9 USB can be mounted horizontally or vertically and cash box capacities offered hold 300 or 600 street grade notes.
Download the full NV9 USB+ Standad Options flyer here.

Maintaining The NV9 Bank Note Validator
How to maintain the NV9 bank note validator.
The NV9 / NV9 USB bank note validator has been designed to minimise any performance variation over time. Much of this is achieved by careful hardware and software design. However, depending upon the environment, the NV9 / NV9 USB may at some time require cleaning, belt changing or note path clearing.
The NV9 USB Maintenance Guide is available to download here
Interface Converters
Identifying the correct interface converter.
The following interfaces are available to use with our current product range.
IF5 –> MDB Voltage Converter
IF6 –> NV4 to NV7 / 8 / 9 /10 Adaptor
IF9 –> SSP to Binary
IF10 –> SSP to Parallel
IF10e –> eSSP to Parallel
IF14 –> eSSP to CCTalk
IF15 –> SSP to Pulse
IF17 –> SSP to USB
IF18 –> TTL to RS232

eSSP Encrypted Smiley Secure Protocol
What is eSSP?
The encryption of SSP (Smiley Secure Protocol) ensures superior protection and reliability of the data, which is transferred between validator and host machine. The encryption key is 128 bits long, and is divided into two parts. The lower 64 bits are fixed and specified by the machine manufacturer, allowing the manufacturer to control which devices are used in their machines. The higher 64 bits are securely negotiated by the slave and host at power up, ensuring each machine and each session are using different keys. This encryption algorithm is approved by the US military for its advanced security.
eSSP is a secure serial interface specifically designed to address the problems experienced by cash systems in gaming machines. Problems such as acceptor swapping, reprogramming acceptors and line tapping are all addressed. This interface is recommended for all new designs. The interface uses a master slave model; the host machine is the master and the peripherals (note acceptor, coin acceptor or coin hopper) are the slaves. Data transfer is over a multi-drop bus using clock asynchronous serial transmission with simple open collector drivers.
The integrity of data transfers is ensured through the use of 16 bit CRC checksums on all packets. Each SSP device of a particular type has a unique serial number; this number is used to validate each device in the direction of credit transfer before transactions can take place. Commands are currently provided for coin acceptors, note acceptors and coin hoppers. All current features of these devices are supported.
To help in the software implementation of eSSP, ITL can provide DLL controls and Visual Basic applications on request. Please contact Этот адрес электронной почты защищен от спам-ботов. У вас должен быть включен JavaScript для просмотра. for more information.
Download Issues
I am encountering problems while downloading a firmware or dataset file.
Firstly check the version of your Bank Note Validator Manager to ensure you are using the most recent version of Validator Manager. Visit the Support section of our website and log in to Support Downloads for the latest version of Validator Manager and all other software files.
Always double check that you are downloading the correct firmware and dataset files for your validator.
If you are still encountering problems please contact your local office support team or email:Этот адрес электронной почты защищен от спам-ботов. У вас должен быть включен JavaScript для просмотра.
.
DA3 Programming
How to programme validators using the DA3?
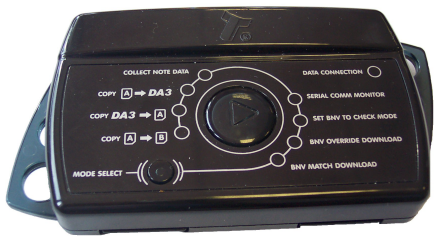
DA3 Quick Reference Guide
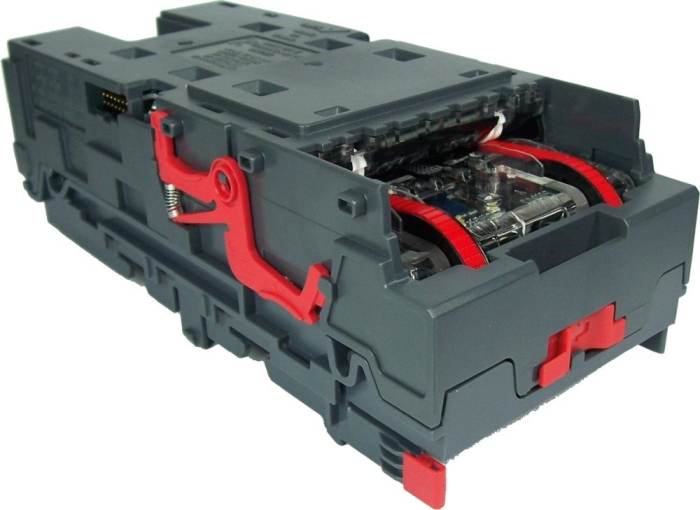
The DA3 is a validator programming system that enables the user to re-program ITL Bank Note Validators in the field, without the use of a PC. Dataset and firmware files for different validator models can be stored on the DA3 and once programmed the user can update or override existing software as well as test the functionality of the validator, away from the host machine.
This article is intended as a quick reference guide to illustrate the common features of the DA3 programming unit. For full details of the use of the DA3 please download the Manual from our website within Products / Support Tools.
Setup DA3 using VPS
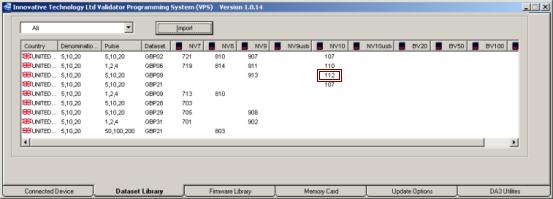
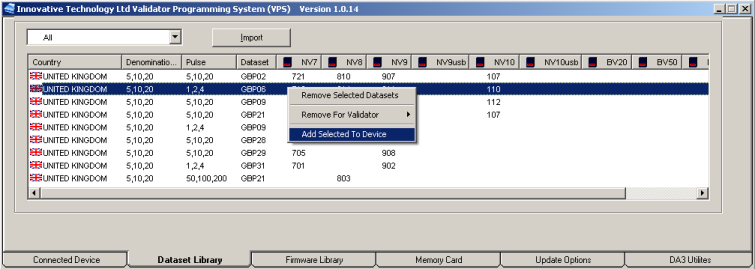
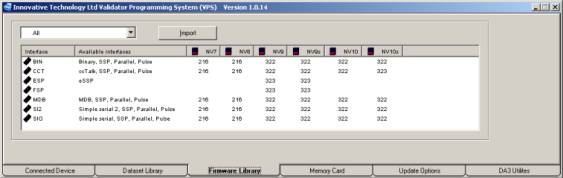
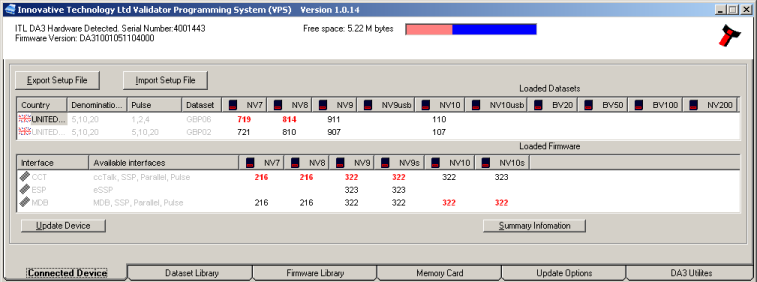
Skip to stage 4 if you have already installed the required datasets and firmware. Select Dataset Library tab and import required datasets into VPS using the Import button. Once imported, the available datasets will be listed as shown below. The numbers in the columns relate to the version of the dataset. The first number is the model of validator (1 for NV10).
1) Add the datasets to the DA3 by right clicking the line and selecting Add Selected to Device
2) If using a non-USB unit (NV7/NV8/NV9/NV10), import firmware in the Firmware Library tab. Add to device in the same way as the dataset. The numbers relate to the version of the firmware, for example 323 is version 3.23.
3) In the Connected Device tab, review the datasets and firmware to be downloaded to the DA3.
4) To overwrite the validator settings and interfaces rather than just update: tag the firmware and datasets you intend to use for each validator by clicking on the version number so it is highlighted in red. In the example below, NV10 validators will be set to MDB interface and NV9 to ccTalk interface.
5) To set the interface of BV and USB products, see Setting USB/BV Validator Interface section below.
6) Click the Update Device button. Ensure the DA3 is not unplugged whilst update is in progress.
Updating Validator
Connect the DA3 to the validator using the left connector.
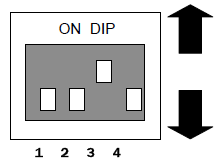
Set the validator to SSP mode:
- Dip switches
Make a note of the current settings and change to 1 down, 2 down, 3 up, 4 down as shown here.
- Push button
Power validator and double click the configuration button like a computer mouse. If it flashes once, it is already in SSP mode. Otherwise, hold the button in until the bezel LEDs come on continuously. Release the button and the validator will change to SSP mode and reset.
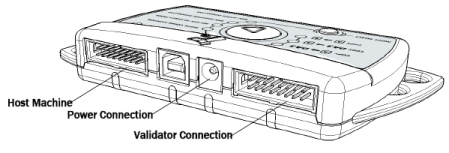
Either power the DA3 and validator using a 12v power supply or through the host connector indicated above.
To just update the firmware and dataset to the version on the DA3:
- Press the mode select button until BNV Match Download is selected.
- Press the centre RUN button.
The DA3 will then program the validator with the latest versions of the software currently programmed into the validator. Settings and special interface selection will remain the same.
To overwrite the firmware, dataset and settings to the tagged versions in the DA3:
Care must be taken when using this mode. Ensure that the correct files are tagged for the interface used in the host machine. Failure to do so may overwrite the validator with incorrect settings and the validator may no longer function in the machine.
- Press the mode select button until BNV Override Download is selected.
- Press the centre RUN button.
- The DA3 will then program the validator with the tagged versions of the software installed in the DA3 regardless of validator settings.
When the centre RUN button changes colour back to green, the update is complete. If the button changes to red the download has failed. Please refer to the Error Code Table below.
Disconnect the DA3 and return validator to host system. Remember to reset the mode of the validator either by dip switches or by holding in the button
Setting USB/BV Validator Interface
The USB validators (NV9USB & NV10USB) and BV range require the configuration card in order to set the interface. The configuration card [GA713] can be downloaded from our website. Go to Products and then select the validator you are trying to update and download the configuration card pdf document. If you cannot locate the configuration card contact Этот адрес электронной почты защищен от спам-ботов. У вас должен быть включен JavaScript для просмотра. for this document.
Error Codes
The list below shows an explanation of the error codes displayed on the Mode Indicator LED’s through the DA3’s centre RUN button (errors are indicated by a red light).
Flashes
2. No validator connection found
3. No valid download files found / files not tagged
4. Download fail
5. Memory card fail
The flash code is shown by a long flash then a number of short flashes. The number of short flashes indicates the cause of failure. Please contact your local office for assistance or email Этот адрес электронной почты защищен от спам-ботов. У вас должен быть включен JavaScript для просмотра.