close

Busca por producto, información de soporte y más


Most popular searches:
About Page

Search for "blog"

Search for "lorem"

Centro de soporte

Preguntas frecuentes

Último Paquete de Actualización SMART de GBP

Último Paquete de Actualización EUR SMART

Validadores compatibles

NV9ST

Fabricado desde 2016

NV10USB+

Fabricado desde 2016

NV200ST Range

NV200 Revisión de construcción 30+ Fabricado desde 2017

Para más información sobre los validadores obsoletos que no se pueden actualizar, por favor visite Notificaciones de Productos Obsoletos en la sección de Preguntas Frecuentes del Centro de Soporte.

SMART Update no es compatible con el Rango Espectral NV9 ni con el Rango Espectral NV200.

Rango NV9 Spectral

Rango Nv200 Spectral

  • PC que utilice Windows 8.1 o superior

  • Software DPS

  • 1 x Kit de Programación Portátil DA3 (PA03035) – Ya no disponible para la compra

  • Último Firmware SMT DA3

  • 1 x Tarjeta SD

  • Tarjeta SD mínima de 2GB, Clase 4. Se han probado Sandisk, Kingston Technology y Transcend. El formato debe ser FAT32.

  • Puede que existan tarjetas Clase 10 que no funcionen. Sandisk Extreme ha sido probada y funciona.

  • Archivo UpdateV2.bin

  • Archivo updateST.nv2 si se actualiza NV200ST o SMART Payout

Extraer el archivo ZIP de Actualización SMART en una ubicación adecuada del PC

Coloque la tarjeta SD en el lector de tarjetas de memoria del PC y copie UpdateV2.bin en la raíz de la tarjeta SD

Copie updateST.nv2 en la tarjeta SD también si tiene la intención de actualizar NV200ST o SMART Payout usando el lector de tarjetas incorporado.

Conecta el DA3 al PC usando el cable USB tipo A a tipo B y abre el software DPS.

Seleccione ‘Cambiar la versión del firmware DA3’ en la parte superior de la pantalla.

  • Seleccione el firmware SMT más reciente, en este ejemplo DA310012625526SMT.vps
  • Seleccione ‘Abrir’

Seleccione ‘Sí’ para actualizar el firmware DA3

Una vez que la actualización del firmware esté completa, desconecte el DA3 del PC.

NV9 Range and NV10ST

Insert the SD card with the UpdateV2.bin into Slot A on the DA3

Connect the DA3 to the validator using the ribbon cable and power it from the 16 way host connector. These connections are labelled on the rear of the DA3.


Allow validator to power up and ensure it is in SSP mode.

Refer to the Product Technical Manual for instructions on how to put the validator into SSP.

Press the Blue Play Button on the DA3 to begin the update. The button will turn Green once the update is complete and the validator will reset.


Disconnect the DA3 and re-connect the validator to the host machine.


Update Failures

The Play Button will turn Red if the update is unsuccessful and the BNV MATCH DOWNLOAD LED will blink a sequence code to describe the fail reason.

LED Colour status (Flashes)

Description


Long

Short

1x

2x

No Validator Connection Found

Check Connections

1x

3x

No Valid Download Files Found

Check SD Card Config

If the original dataset file no longer exists you will receive this error and the dataset will need to be changed.

Updating NV200 & Smart Payout

Insert the SD card with the UpdateV2.bin and updateST.nv2 into the card reader slot built into the front of the validator.


The validator will flash a Yellow and Blue colour sequence during update.

Once complete the bezel will go Green.


The SD card can be removed and the validator will reset.


Update Failures

The bezel will go red if the update is unsuccessful.

  • Check SD Card Configuration

If the original dataset file no longer exists you will receive this error and the dataset will need to be changed.

Sign up for your account

Si aún no se ha registrado para su cuenta, por favor siga el siguiente proceso.

Las cuentas registradas en el sitio web antiguo ya no están activas. Se requiere un nuevo registro para que todas las cuentas puedan acceder a los conjuntos de datos.
 

Navega al botón ‘Iniciar sesión’ en la parte superior derecha del sitio web.

Seleccione el enlace ‘Regístrese ahora’ en la parte inferior del cuadro emergente.

Envía tu código de verificación para confirmar tu dirección de correo electrónico. Introduce tu dirección de correo electrónico y selecciona el botón ‘Enviar código de verificación’.

Introduce el código de verificación recibido en la dirección de correo electrónico en el cuadro ‘Código de verificación’ y selecciona ‘Verificar código’.

Complete los campos restantes en el formulario de registro.

Tu contraseña debe cumplir con los siguientes criterios: 8-16 caracteres, incluyendo 3 de los 4 siguientes: letras minúsculas, letras mayúsculas, dígitos (0-9) y uno o más de los siguientes símbolos: @ # $ % ^ & * – _ + = [ ] { } | : ‘ , ? / ` ~ ” ( ) ; .

Selecciona el botón para ‘Crear’ tu cuenta. Se iniciará sesión en tu panel cuando la cuenta se cree.

El registro puede tardar hasta 5 minutos en replicarse en todo el sitio web.

Todo el contenido de soporte, incluidos los conjuntos de datos, ahora se encuentra dentro del Centro de Soporte del sitio web.

Una vez que hayas iniciado sesión, navega al sitio web ‘Centro de Soporte’.

Desplace la página hacia abajo hasta la sección ‘Soporte de Producto’ y seleccione el producto requerido.

A los efectos de este documento, usaré ‘NV200 Spectral’ como ejemplo.

Una vez que hayas navegado hasta el producto requerido, selecciona el menú desplegable ‘Conjuntos de datos’.

Aquí puedes filtrar por moneda seleccionando ‘Todas’ en el filtro ‘Elige una moneda’.

Una vez que se selecciona la moneda, la tabla de conjuntos de datos de moneda se filtrará según la moneda elegida. En este ejemplo GBP.

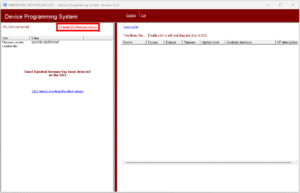
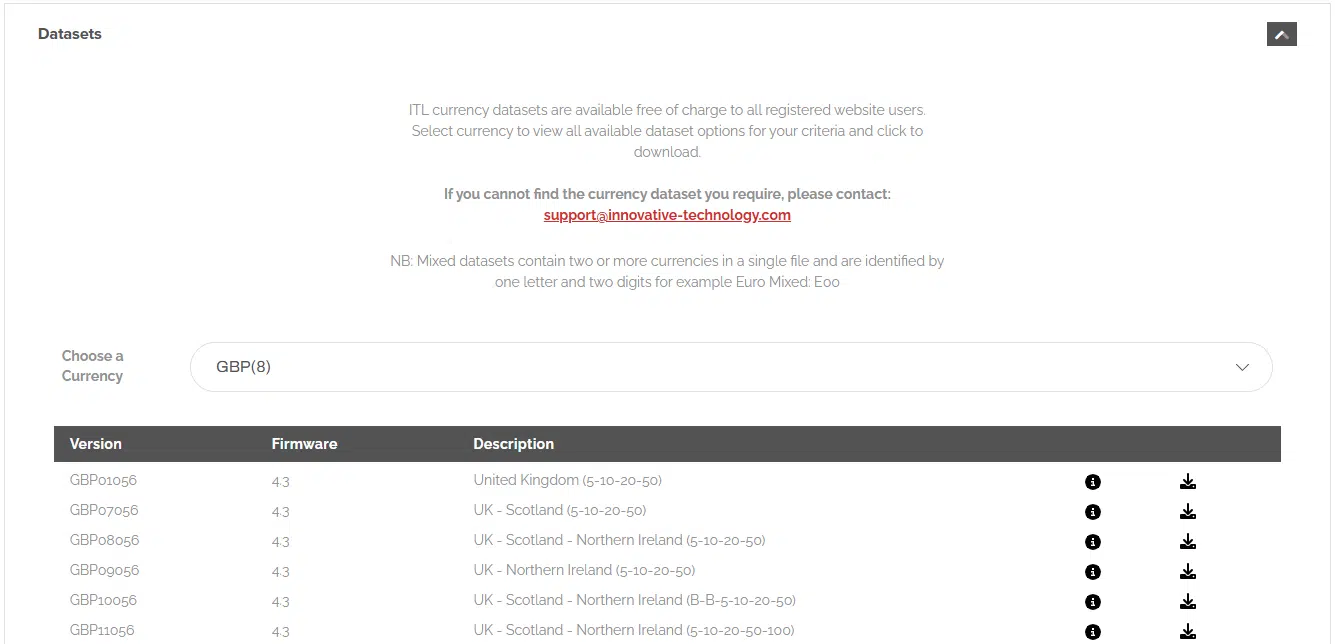
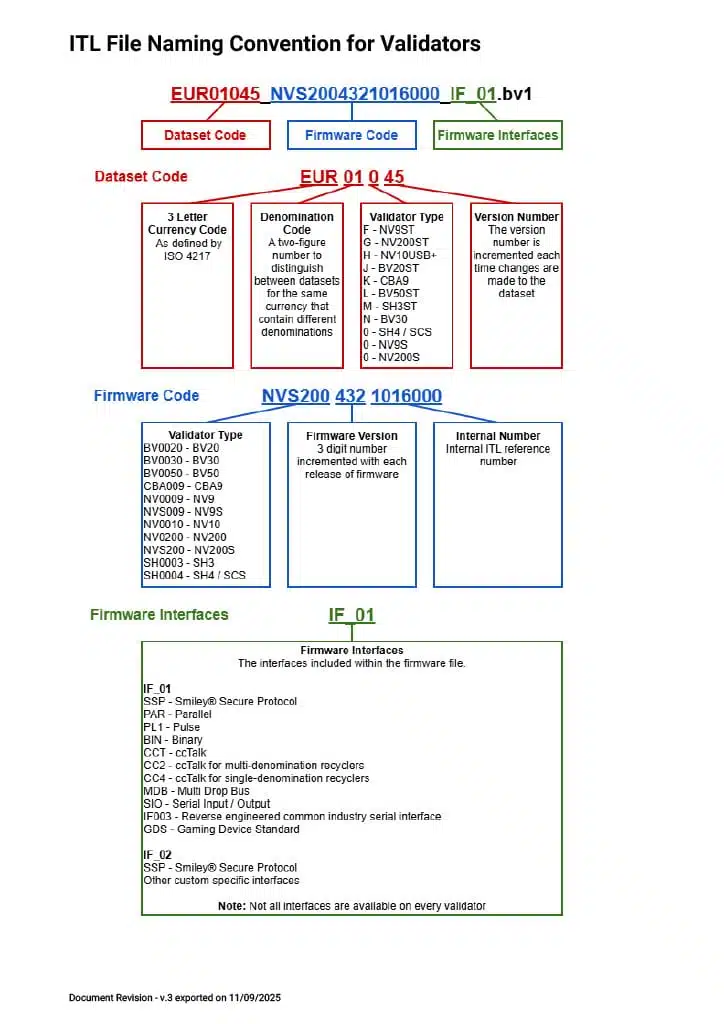
Cada fila de la tabla de divisas filtrada proporciona la información básica relacionada con ese conjunto de datos de divisas.

  • Versión
  • Firmware
  • Descripción

Se puede obtener más información haciendo clic en el icono de Información de cada uno currency línea del conjunto de datos

Cuando estén disponibles, las imágenes de los billetes se incluirán en la información del conjunto de datos para mostrar las emisiones de billetes aceptadas.

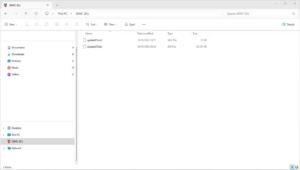
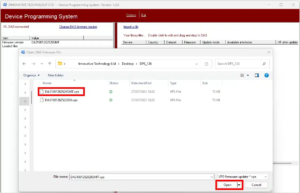
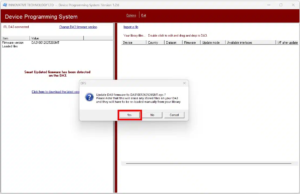
Seleccione el icono de descarga al final de la línea del conjunto de datos.

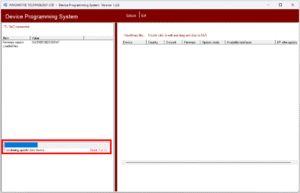
Tu conjunto de datos se descargará en tu PC listo para la actualización del validador.

Part No.

Description

Use Case

PSU Requirement

PA03837

IF17 Programming Kit

Programming on Windows PC with Validator Manager

12vDC

Part No.

Description

Use Case

PSU Requirement

PA03837

IF17 Programming Kit

Programming on Windows PC with Validator Manager

12vDC

CN00392

NV9/NV10 Host Cable

Programming on Windows PC with Validator Manager

Part No.

Description

Use Case

PSU Requirement

PA03837

IF17 Programming Kit

Programming on Windows PC with Validator Manager

NV11S – 12vDC
NV9S / NV22 – 12/24vDC

CN00392

NV9/NV10 Host Cable

Programming on Windows PC with Validator Manager


Micro SD Card

Field Updates

Part No.

Description

Use Case

PSU Requirement

PA03837

IF17 Programming Kit

Programming on Windows PC with Validator Manager

12/24vDC

CN00214

USB A to USB B Cable

NV200ST – CN00397 or CN00398 + WR00147 required for power.

SMART Payout – CN00397 or CN00398 required for power.

Programming on Windows PC with Validator Manager

IC02017

SD Card

Field Updates

Can be converted to a GBP or EUR Smart Update SD Card.

Part No.

Description

Use Case

PSU Requirement

PA03837

IF17 Programming Kit

Programming on Windows PC with Validator Manager

12/24vDC

CN00214

USB A to USB B Cable

NV200 Spectral – CN00397 or CN00398 + WR00147 required for power.

Spectral Payout – CN00397 or CN00398 required for power.

Programming on Windows PC with Validator Manager

IC02017

SD Card

Field Updates

Part No.

Description

Use Case

PSU Requirement

PA03837

IF17 Programming Kit

Programming on Windows PC with Validator Manager

24vDC

CN00214

USB A to USB B Cable

CN00397 or CN00398 required for power.

Programming on Windows PC with Validator Manager

IC02017

SD Card

Field Updates

Part No.

Description

Use Case

PSU Requirement

PA03837

IF17 Programming Kit

Programming on Windows PC with Validator Manager

24vDC

CN00214

USB A to USB B Cable

CN00389 required for power.

Programming on Windows PC with Validator Manager

Part No.

Description

Use Case

PSU Requirement

PA03837

IF17 Programming Kit

TSCS

Hoppers to be updated individually.

Programming on Windows PC with Validator Manager

24vDC

CN00214

USB A to USB B Cable

SH4 / SCS – CN00389 required for power.

TSCS

Hoppers to be updated individually with rev 1 baseplate.

1 x CN00389 required for power with rev 2 baseplate.

Programming on Windows PC with Validator Manager

IC02017

SD Card

Field Updates

Product Name Label Identifier Dataset Code Manufactured Date Obsolescence Date
BV20 RED XXX012 Before 2016 June 2021
BV20ST BLUE XXX01J Before 2022 Dec 2025
Product Name Label Identifier Dataset Code Manufactured Date Obsolescence Date
BV50 RED XXX013 Before 2016 June 2021
Product Name Label Identifier Dataset Code Manufactured Date Obsolescence Date
BV100 All XXX015 Before 2019 Dec 2024
Product Name Label Identifier Dataset Code Manufactured Date Obsolescence Date
NV4 All All Before 2004 Dec 2009
Product Name Label Identifier Dataset Code Manufactured Date Obsolescence Date
NV7 All All Before 2007 Jan 2012
Product Name Label Identifier Dataset Code Manufactured Date Obsolescence Date
NV8 All All Before 2007 Jan 2012
Product Name Label Identifier Dataset Code Manufactured Date Obsolescence Date
NV9 All Original XXX019 Before 2009 Dec 2014
NV9USB Green XXX01B Before 2014 Sept 2019
NV9USB+ Blue XXX01E Before 2016 June 2021
Product NameLabel IdentifierDataset CodeManufactured DateObsolescence Date
NV10All OriginalXXX011Before 2009Dec 2014
NV10USBRedXXX011Before 2016June 2021
Product Name Label Identifier Dataset Code Manufactured Date Obsolescence Date
NV200 BR29 & Below XXX016 Before 2017 June 2021
Product Name Label Identifier Dataset Code Manufactured Date Obsolescence Date
SMART Payout Module BR35 & Below XXX016 Before 2017 June 2021
SMART Payout Module BR36+ XXX01G 2017+ June 2029
Product Name Label Identifier Dataset Code Manufactured Date Obsolescence Date
SMART Hopper BR29 & Below XXX010 Before 2017 June 2021
SMART Hopper 3 Firmware SH0003 XXX01M Before 2023 Dec 2025

Soporte de producto

NV4000 Spectral

NV200 Spectral

Spectral Payout

Spectral BNF

Safe Interface

NV9 Spectral

NV22 Spectral

NV11 Spectral

SMART Coin System

Twin SMART Coin System

SMART Hopper

NV200

MyCheckr

MyCheckr Mini

ICU Lite

ICU Pro

CBA9

CBA11

BV30

BV50

NV10

CashGenic

Smart Hopper 3

SMART Payout

NV9 USB

NV11

BV20

Boletines Técnicos

Vídeos de soporte

Submit RMA
A return merchandise authorisation (RMA), is a part of the process of returning a product to receive a refund, replacement, or repair during the product's warranty period.
  
ITL logo
Resumen de privacidad

Esta web utiliza cookies para que podamos ofrecerte la mejor experiencia de usuario posible. La información de las cookies se almacena en tu navegador y realiza funciones tales como reconocerte cuando vuelves a nuestra web o ayudar a nuestro equipo a comprender qué secciones de la web encuentras más interesantes y útiles.