


")
")
How to programme validators using the DA3?
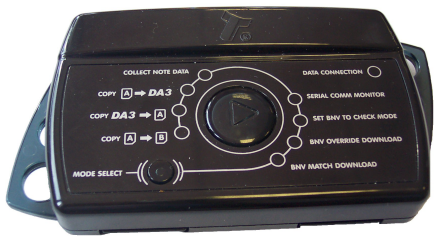
DA3 Quick Reference Guide
The DA3 is a validator programming system that enables the user to re-program ITL Bank Note Validators in the field, without the use of a PC. Dataset and firmware files for different validator models can be stored on the DA3 and once programmed the user can update or override existing software as well as test the functionality of the validator, away from the host machine.
This article is intended as a quick reference guide to illustrate the common features of the DA3 programming unit. For full details of the use of the DA3 please download the Manual from our website within Products / Support Tools.
Setup DA3 using VPS
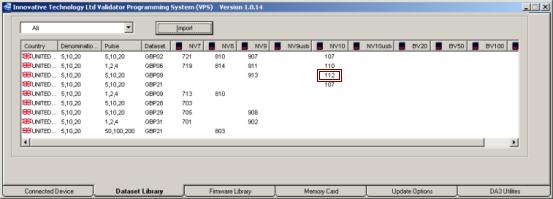
Skip to stage 4 if you have already installed the required datasets and firmware. Select Dataset Library tab and import required datasets into VPS using the Import button. Once imported, the available datasets will be listed as shown below. The numbers in the columns relate to the version of the dataset. The first number is the model of validator (1 for NV10).
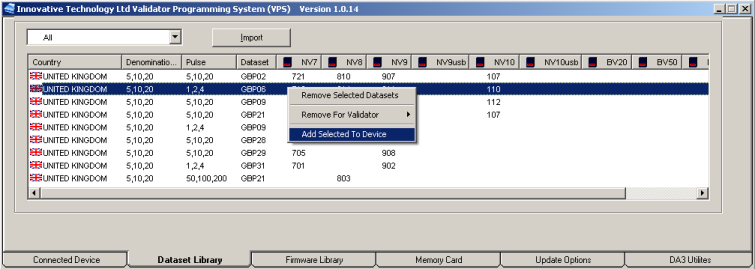
1) Add the datasets to the DA3 by right clicking the line and selecting Add Selected to Device
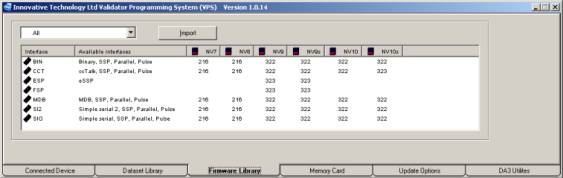
2) If using a non-USB unit (NV7/NV8/NV9/NV10), import firmware in the Firmware Library tab. Add to device in the same way as the dataset. The numbers relate to the version of the firmware, for example 323 is version 3.23.
3) In the Connected Device tab, review the datasets and firmware to be downloaded to the DA3.
4) To overwrite the validator settings and interfaces rather than just update: tag the firmware and datasets you intend to use for each validator by clicking on the version number so it is highlighted in red. In the example below, NV10 validators will be set to MDB interface and NV9 to ccTalk interface.
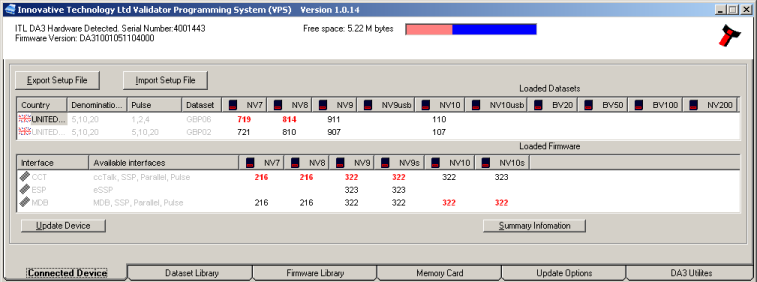
5) To set the interface of BV and USB products, see Setting USB/BV Validator Interface section below.
6) Click the Update Device button. Ensure the DA3 is not unplugged whilst update is in progress.
Updating Validator
Connect the DA3 to the validator using the left connector.
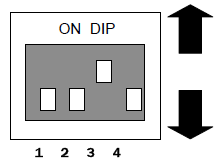
Set the validator to SSP mode:
- Dip switches
Make a note of the current settings and change to 1 down, 2 down, 3 up, 4 down as shown here.
- Push button
Power validator and double click the configuration button like a computer mouse. If it flashes once, it is already in SSP mode. Otherwise, hold the button in until the bezel LEDs come on continuously. Release the button and the validator will change to SSP mode and reset.
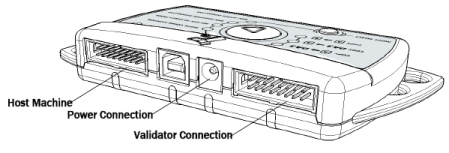
Either power the DA3 and validator using a 12v power supply or through the host connector indicated above.
To just update the firmware and dataset to the version on the DA3:
- Press the mode select button until BNV Match Download is selected.
- Press the centre RUN button.
The DA3 will then program the validator with the latest versions of the software currently programmed into the validator. Settings and special interface selection will remain the same.
To overwrite the firmware, dataset and settings to the tagged versions in the DA3:
Care must be taken when using this mode. Ensure that the correct files are tagged for the interface used in the host machine. Failure to do so may overwrite the validator with incorrect settings and the validator may no longer function in the machine.
- Press the mode select button until BNV Override Download is selected.
- Press the centre RUN button.
- The DA3 will then program the validator with the tagged versions of the software installed in the DA3 regardless of validator settings.
When the centre RUN button changes colour back to green, the update is complete. If the button changes to red the download has failed. Please refer to the Error Code Table below.
Disconnect the DA3 and return validator to host system. Remember to reset the mode of the validator either by dip switches or by holding in the button
Setting USB/BV Validator Interface
The USB validators (NV9USB & NV10USB) and BV range require the configuration card in order to set the interface. The configuration card [GA713] can be downloaded from our website. Go to Products and then select the validator you are trying to update and download the configuration card pdf document. If you cannot locate the configuration card contact Diese E-Mail-Adresse ist vor Spambots geschützt! Zur Anzeige muss JavaScript eingeschaltet sein! for this document.
Error Codes
The list below shows an explanation of the error codes displayed on the Mode Indicator LED’s through the DA3’s centre RUN button (errors are indicated by a red light).
Flashes
2. No validator connection found
3. No valid download files found / files not tagged
4. Download fail
5. Memory card fail
The flash code is shown by a long flash then a number of short flashes. The number of short flashes indicates the cause of failure. Please contact your local office for assistance or email Diese E-Mail-Adresse ist vor Spambots geschützt! Zur Anzeige muss JavaScript eingeschaltet sein!